You turn on the kitchen tap after three days of heavy rain, and the water comes out faintly brown. Or maybe it's the other way round: you filled the sump last night, nobody used much water, and this morning the motor's running dry.
Either way, you've got that sinking feeling. The sump is underground. You can't see it, you can't easily get into it, and the one thing you really care about is whether the water your family drinks is still safe.
Here's the short version. Most sump leakage after rain comes from a small number of places, and you can narrow it down yourself before calling anyone. Some fixes are almost free. Others need the sump emptied and treated properly from the inside. Let's work out which one you're dealing with.
The short answer
When it rains hard for days, two things happen around an underground sump. The groundwater around it rises and starts pushing against the walls and floor. And rainwater running across your compound looks for the lowest point, which is often the sump lid.
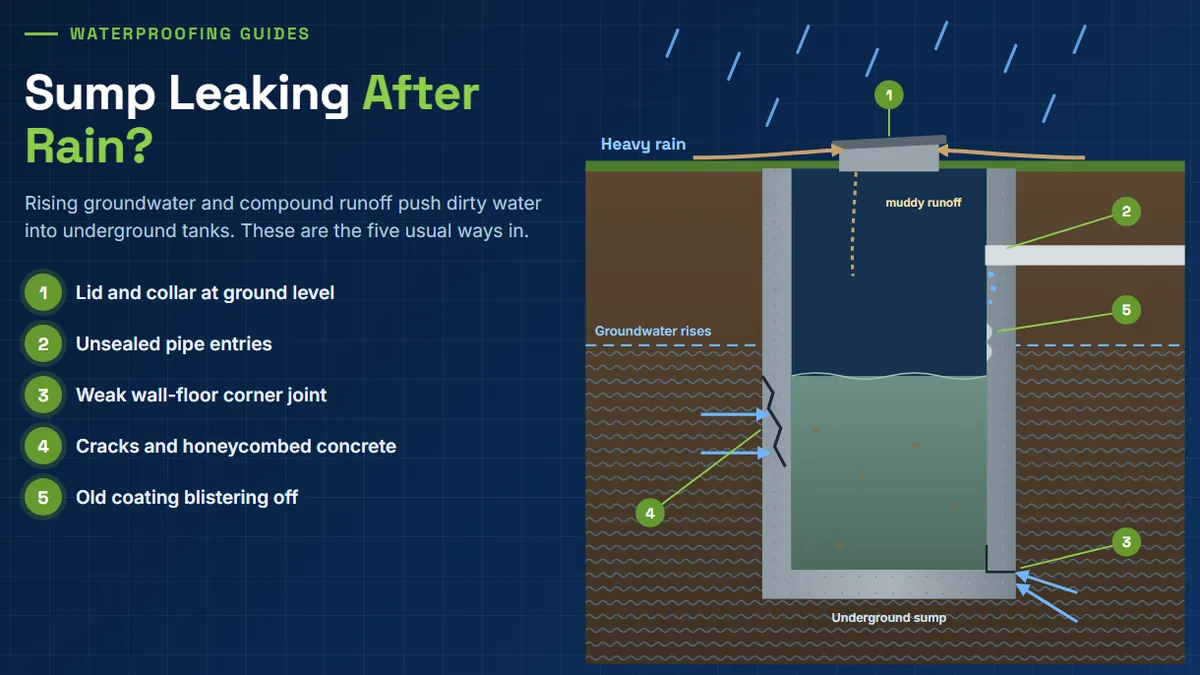
So dirty water gets in through five usual routes:
- The manhole lid and collar, especially if it sits level with the ground.
- Pipe entries, where the inlet, outlet and overflow pipes pass through the wall.
- The corner where the walls meet the floor, which is often a weak construction joint.
- Cracks and honeycombed patches in the concrete or plaster.
- An old coating or plaster that has blistered or peeled off the inside.
Find which route it is, and you'll know whether you need a cheap, quick fix or a proper waterproofing job.
| What you notice | Most likely cause | What usually fixes it |
|---|---|---|
| Muddy water only after heavy rain | Runoff entering through the lid or collar | Raise the collar, fit a sealing lid, slope the ground away |
| Wet ring around a pipe | Unsealed pipe entry | Seal the joint around the pipe, then waterproof |
| Damp band along the bottom of the walls | Weak wall-floor joint | Repair mortar cove, then crystalline waterproofing |
| Level rises overnight with the inlet closed | Groundwater seeping in through cracks or joints | Stop active leaks, repair, then waterproof from the inside |
| Level drops overnight | Water leaking out through cracks | Crack repair plus waterproofing |
| Blistered or peeling inside coating | Water pushing from behind a surface coat | Remove it, then use a crystalline treatment |
Stay safe first: never climb into a sump alone
I'll say this plainly because it matters more than anything else here. A sump is a confined space. Air inside a closed underground tank can be low on oxygen or hold gases you can't smell, especially after it's been sealed and wet for days. People have been badly hurt climbing in to "just take a quick look".
So:
- Switch off the pump at the board before anyone goes near it.
- Open the lid and let it air out properly before anyone goes in.
- Never go in alone. One person stays outside, watching, the whole time.
- If the sump is deep or narrow, don't go in at all. That's a job for people with the right gear.
You can do most of the checks below from the top, with a torch.
Is water getting in or leaking out? The overnight test
Before you blame anything, find out which way the water is moving. This simple test does it.
- Switch off the motor and close the inlet valve, so no new water enters from the corporation line or your borewell.
- Mark the water level on the wall with chalk or a strip of tape. Take a photo.
- Leave it overnight without using any water from the sump.
- Check the mark in the morning.
If the level dropped, water is leaking out. That's common in the dry months too, and it usually means cracks or a failed joint.
If the level rose, with the inlet closed, water is getting in. After rain, that's almost always groundwater or runoff, and it's the one that worries me more, because that water hasn't been through any treatment.
If the water looks muddy, smells, or you can see bits floating in it, stop using it for drinking and cooking now. Don't wait for the test result. Use other water until the sump is repaired and cleaned out.
5 places sumps usually leak
1. The lid and the collar around it
This is the most common one after rain, and honestly it's the cheapest to fix. If the manhole collar is at ground level, or the lid doesn't sit tight, every heavy shower sends a little stream of muddy compound water straight in.
Look for: a muddy streak running down the inside wall just below the opening, or silt collecting at the bottom.
The fix: raise the collar a few inches above ground level, fit a lid that seals, and slope the ground so rainwater runs away from the sump, not towards it.
2. Pipe entries
Wherever a pipe passes through the wall, there's a joint between pipe and concrete. Those joints often weren't sealed properly when the sump was built, and they open up as the pipes move.
Look for: a wet ring or a trickle around the inlet, outlet or overflow pipe, often worse after rain.
3. The wall-floor corner
The floor and walls are usually cast at different times, so the corner where they meet is a joint, not one solid piece. Groundwater loves that line.
Look for: a damp or stained band along the bottom of the walls, or seepage that comes back right after you empty the sump.
4. Cracks and honeycombed concrete
Hairline cracks, and rough, stony patches where the concrete wasn't compacted well, both let water through. Brick sumps with cement plaster are even more prone, because the plaster cracks and the brick behind it soaks up water.
5. Old coating or plaster that has failed
If someone painted or coated the inside years ago, look for blisters, peeling patches or hollow-sounding plaster. That usually means water has got behind the coating, which brings me to the most common mistake people make.
What to do now, and what to do after the rains
Here's my honest opinion: you can't do a permanent sump repair while the ground around it is soaked. The concrete is wet, groundwater is pushing in, and most waterproofing materials need a reasonably dry, clean surface to bond.
During the rain, do this:
- Fix the lid and collar problem first. It's often the main culprit, and it costs very little.
- Stop using the water for drinking if there's any doubt.
- If water is actively spurting in through a crack or pipe joint, a specialist can stop it with a fast-setting plug or PU injection grouting, even while it's wet. Our guide on sealing active leaks with PU injection explains how that works.
After the rains, do it properly: empty the sump, clean it, let it dry as much as possible, and then repair and waterproof the inside, as described below.
How a proper sump repair is done
There's one idea worth understanding here, because it explains why so many sump repairs fail.
When a sump is already built, you can only treat it from the inside. But the groundwater pushes from the outside. Engineers call this "negative-side" waterproofing. A thin paint or membrane brushed on the inside tends to get pushed off, blistering and peeling, because the water presses on it from behind. You might have seen that already.
What works better is a treatment that gets into the concrete instead of just sitting on top. That's why crystalline waterproofing is our first choice for sumps. It reacts with moisture inside the concrete's pores and blocks the water paths from within, so groundwater pressure can't simply peel it off. We compare the options in crystalline vs membrane waterproofing.
A typical sequence looks like this:
- Empty, clean and inspect. Scrub off silt and slime, and check every wall, the floor, the corners and the pipe entries.
- Stop any active leaks with a fast-setting plug or PU injection grouting.
- Repair the damage. Cut out cracked or hollow plaster and weak concrete, and rebuild with a polymer-modified repair mortar and a bonding agent from a concrete repair range. Our post on why concrete repairs fail in hot, humid weather covers how to make repairs last.
- Seal the pipe entries so the joint between pipe and concrete is properly filled and waterproofed.
- Round off the wall-floor corner with a cove of repair mortar, so the waterproofing can run smoothly across the joint instead of cracking at a sharp edge.
- Apply the waterproofing coat. Use a crystalline slurry, or a cementitious tank coating such as Fosroc Nitocote CM210, in the coats and thickness the datasheet asks for.
- Check it's approved for drinking water. Anything that touches stored drinking water must be rated non-toxic and suitable for potable water contact. If the datasheet doesn't say so clearly, don't use it in a drinking-water sump.
- Cure it, then flush it. Let the coating cure for the full time the datasheet gives. Then fill the sump, drain it, and refill it before you use the water again.
It isn't glamorous work. But done in that order, it fixes the cause rather than just covering it up.
When to call a professional
Some sump problems are a weekend job for a handy owner. Many aren't. Call someone if:
- The sump is deep, narrow or hard to ventilate. That's a safety call, not a skills one.
- Water is pouring in through cracks or joints, even with the inlet closed.
- The walls have wide cracks, exposed or rusting steel, or concrete that crumbles when you scrape it. That can be a structural issue, so get it checked.
- Your septic tank or soak pit is close to the sump and the water smells. Treat that as a health problem first.
- You've already had it "waterproofed" and the coating is peeling again.
Ask any applicator three things: which product they'll use, whether it's approved for drinking water, and how they'll handle the pipe joints and the wall-floor corner. If they can't answer those clearly, keep looking.
Products we'd use for sump and tank repairs
We're Vchemics India Solutions, a construction chemicals manufacturer and authorized distributor with branches across Tamil Nadu. For sumps and water tanks, these are the ranges we'd reach for:
- Waterproofing Chemicals: crystalline waterproofing that works against groundwater pressure from the inside, including non-toxic, potable-grade formulations for water-retaining tanks and sumps.
- PU Injection Grouting: for stopping active leaks through cracks and joints before the repair starts.
- Concrete Repair: polymer-modified repair mortars and bonding agents for cracked plaster, honeycombed concrete and the wall-floor cove.
- Protective Coatings: for tanks and surfaces that need an extra protective finish. Check potable-water suitability on the datasheet first.
The same principles apply to basements and lift pits, which face the same groundwater pressure. See our basement waterproofing solution if that's your situation.
Conclusion
A leaking sump feels like a big, hidden problem, but most of the time the cause is ordinary: a lid at ground level, a pipe joint, the corner at the bottom, or a crack. Do the overnight test, look from the top with a torch, fix the lid first, and keep your family off that water until you're sure it's clean.
Then, once the rains ease, have it repaired properly from the inside, in the right order, with products that are safe for drinking water. If the terrace is leaking too, here are 7 checks for terrace leakage you can do the same day.
Not sure what you're looking at? Take three photos: the inside of the sump from the opening, the lid and collar, and the spot where the pipes come in. Send them on WhatsApp to +91 99423 54602, or use our contact page, and tell us your town. We'll tell you what we see.
Frequently Asked Questions
Why does my sump water turn muddy after rain?
Usually because rainwater or groundwater is getting in. The most common route is a manhole lid or collar at ground level, followed by pipe entries, the wall-floor corner and cracks. Stop using the water for drinking until you've found and fixed the cause and cleaned the sump.
How do I stop water leakage in an underground water tank?
Empty the tank, clean it and work from the inside. Plug any running leak first, then repair cracks and hollow plaster, seal the pipe entries, round off the wall-floor corner and finish with a coat approved for drinking water. If rain's coming in by the lid, fix that first.
How do I know if my sump is leaking?
Close the inlet, switch off the motor, mark the water level and leave it overnight without drawing any water. A drop means it's leaking out, and a rise means water's getting in. Muddy streaks below the lid or a damp band at the wall base show you where to look.
Can a sump be waterproofed from the inside?
Yes, and for an existing sump that's usually the only option. Crystalline waterproofing works best for this, because it seals the concrete from within and resists groundwater pushing from outside. A thin coating on its own tends to peel when water presses on it from behind.
Which waterproofing is best for an underground water tank?
For an existing tank, crystalline is usually the best choice, because it works inside the concrete and groundwater can't peel it off from behind. A cementitious tank coating also works on sound surfaces. Ordinary paints and roof coatings don't belong in a drinking-water tank, so skip them.
Is waterproofing safe for drinking-water tanks?
Only if the product's datasheet clearly says it's non-toxic and suitable for potable water contact. Roof coatings and general-purpose chemicals may not be. Once it's on, let it cure for the full time stated, then fill, drain and refill the tank before anyone drinks from it.
Can a sump be repaired during the monsoon?
Partly. You can raise the collar, fit a tighter lid and plug a running leak while it's raining. The full waterproofing should wait, though, because coatings need a clean, reasonably dry surface, and a soaked sump with groundwater pushing in won't give you that.
How much does sump waterproofing cost?
One manufacturer's guide puts it at roughly ₹40 to ₹120 or more per sq ft in India. Your price depends on the sump's size, how much crack and plaster repair it needs, access, and whether the coating must suit drinking water. Measure the walls and floor together.